
Recently, I spent a few hours reading different sources and experimenting to build an Azure Logic App that listens for Azure Blob storage events and creates a new file in a SharePoint Document Library in another tenant. Here’s how I put it all together.
As you might expect, the key concern is “another tenant.” Creating a file in a SharePoint document library in the same tenant as the Logic App is straightforward. However, the built-in SharePoint connector doesn’t support (AFAIK) authenticating to another tenant. Instead, we’ll use the Microsoft Graph API.
The second concern is which identity to use in the target tenant. The Graph API uses OAuth for authorization. This solution will use an app registration in the target tenant with a client secret (“password”) to authenticate.
In the post, I am going to cover the entire setup end-to-end, including:
- The necessary Graph API calls.
- Finding the necessary SharePoint IDs.
- Creating the app registration.
- Granting the app registration permission to the SharePoint site.
- Creating the Logic App and adding triggers and actions.
- Retrieving the secrets (especially the app registration’s client secret) from Key Vault.
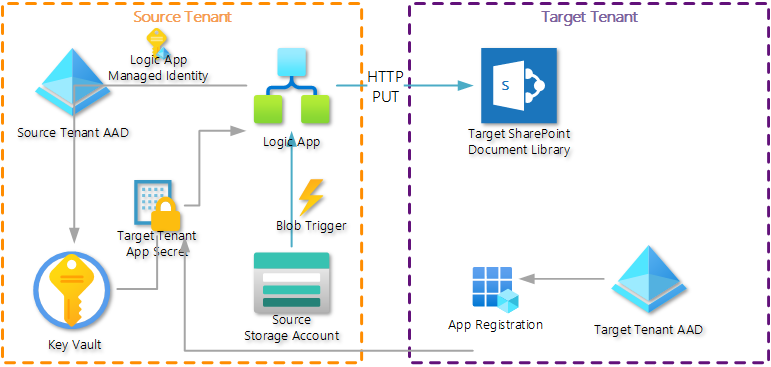
Here is a conceptual diagram of the solution:
To follow along with this solution, you’ll need access to an Office 365 tenant with a SharePoint site containing a document library and an Azure subscription containing a Key Vault. While the purpose of this solution is to solve for the scenario where the Azure subscription is in a different tenant than Office 365, you can follow along even if you only have one tenant.
Graph API Calls
The main Graph API call is a POST to the following endpoint:
https://graph.microsoft.com/v1.0/sites/{siteId}/drives/{driveId}/items/root:/{fileName}:/content
You’ll notice I’ve put three parts between {}, those need to be replaced with your values. Finding the siteId and driveId are covered in the next section. The fileName is up to you. You can also specify a folder, which must be separated from the fileName by a forward slash (/).
Finding the SharePoint IDs
To find the siteId and driveId, we’ll use the Microsoft Graph Explorer, an online tool to test Graph API calls under your identity. When you get to the Graph Explorer, be sure to sign in on the left side with an identity that has permissions to get the SharePoint site and library details in the target tenant (and for future sections, permission to grant permissions on the SharePoint site).
Finding the SharePoint Site ID
The SharePoint site ID is a GUID and you can get it using the following Graph API call:
GET https://graph.microsoft.com/v1.0/sites/{tenantName}.sharepoint.com:/sites/{siteName}?$select=id
You need to replace {tenantName} (including the {}) with the first part of your SharePoint URL. Replace the {siteName} (again, and for the rest of this article, replace the {} also) with the name of the SharePoint site. You might have the SharePoint site in a non-default collection. In that case, put the full path to the site.
For example, if your SharePoint URL starts with mycompany and the name of your site is Important Documents in the External site collection, your URL would be:
https://graph.microsoft.com/v1.0/sites/mycompany.sharepoint.com:/sites/External/Important%20Documents?$select=id
When you’ve pasted your request URL in the box, click Run query. In the Response preview box, you’ll find the Graph API’s response in JSON format. The id property will contain three values separated by commas. The Site ID is the middle value. Copy and paste it somewhere to keep it handy.
Find the Document Library’s Drive ID
Because we’ll be creating a SharePoint file in a Document Library, we’ll use the Drive resource type to refer to the list.
The Graph API call to find all the site’s document libraries’ drive IDs is as follows:
GET https://graph.microsoft.com/v1.0/sites/{siteId}/drives?$select=id,name
You’ll replace {siteId} in the URL with the site ID you retrieved above. This call will return all document libraries in the site because there’s no support for the $filter query string on this endpoint (AFAICT). Review the list of names and IDs returned and copy the ID of the library where you want to create files. In my experience, the drive ID for a library starts with b!.
Creating the App Registration
In the target tenant’s Azure Active Directory, we need to create an identity that the Logic App can use to get access to the target SharePoint site. This identity will be an application registration.
- Go the Azure Active Directory section in the Azure Portal and click on App registrations. Or use this direct link: https://portal.azure.com/#blade/Microsoft_AAD_IAM/ActiveDirectoryMenuBlade/RegisteredApps
- Create a new app registration.
- Choose a descriptive name for the identity.
- Even though this app will be used by a Logic App in another tenant, this app registration itself is a single tenant app.
- After the registration is created, copy and keep track of the Application (client) ID and Directory (tenant) ID GUIDs.
- Next, create a secret for the application registration.
Click on Certificates & secrets and create a new client secret. Copy and keep track of the secret’s value, because it will not be shown again.
After completing these steps, you should have three values:
- The target tenant’s ID
- The new app registration’s application (client) ID
- The new app registration’s secret
Grant App Registration Permission to Document Library
Now that an identity has been created in the target tenant that can be used by the Logic App in the source tenant, this identity needs to be assigned the proper permissions in the site to create new files.
The easy, but less secure way, is to grant the Sites.ReadWrite.All API permission for the Microsoft Graph to this identity.
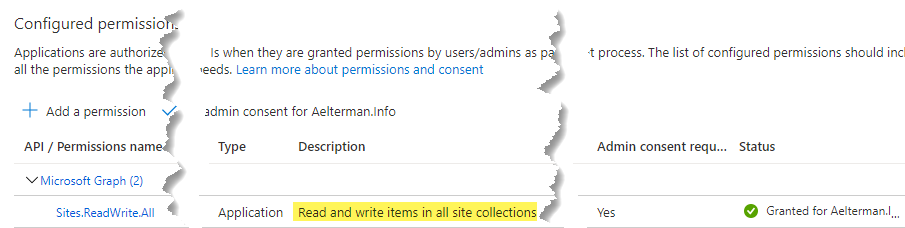
As you can probably gather from the permission name, this will grant the identity access with read and write permissions to all SharePoint sites in the tenant. From a least-privilege perspective, this is not a viable solution.
A better way is to grant the Microsoft Graph Sites.Selected API permission. With this permission assigned, you control on a site-by-site level whether the identity has read and write access.
There is currently no user interface for granting access to a single site. Instead, you’ll need to use the Graph API itself to grant the permission. You can do this directly from the Graph Explorer by sending an HTTP POST to the site’s /permissions endpoint with the following JSON in the request body:
{
  "roles": ["read", "write"],
  "grantedToIdentities": [{
    "application": {
      "id": "{appId}",
      "displayName": "{your Logic App}"
    }
  }]
}
The URL to send the request to is https://graph.microsoft.com/v1.0/sites/{siteId}/permissions. You can also send a GET request to that endpoint to retrieve the currently assigned permissions.
Create Logic App
There are multiple hosting options available for Azure Logic Apps. I created a consumption Logic App. The trigger is an Azure Blob trigger. Because I want to upload the file to SharePoint, I also have to use an Azure Blob Get File Contents action. There is nothing extraordinary about these two actions.

The action that enables uploading the file contents to another tenant’s SharePoint document library is the plain HTTP action. Using the HTTP action, you can configure the
- HTTP method, PUT in this case
- HTTP URL, found in the Graph API Calls heading in this article
- Authentication, which should be set to Azure AD
- Authentication details, which you’ll configure as indicated below

The HTTP action needs the app registration’s client secret (as shown in the last box of the screenshot above). As the name implies, this is a secret. Ideally, you would not keep it in plain text in the Logic App, because anyone with read access to the Logic App can see the secret. In addition, app registration secrets expire and having to edit the Logic App just to update the secret is a lot of extra work. A much better solution is to store the secret (and potentially other values) in a Key Vault.
The Logic App must then be able to access the Key Vault. An easy and secure way to enable this is to assign a system assigned managed identity to the Logic App and granting that identity permissions on the Key Vault. Depending on the Key Vault configuration, you might need to create an access policy (older style) or a role-based access control entry (newer, recommended).
After you create the system assigned managed identity for the Logic App, you reference the identity using the name of the Logic App.
Assuming you’ve created a secret named LogicApp-ClientSecret in a Key Vault named kv-logicapp-prod, you will configure a Get Secret action like below. Note that this action comes before the HTTP PUT action shown above.
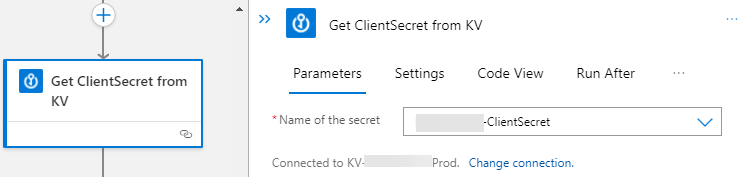
When retrieving secrets from Key Vault, it’s important to toggle the Secure Outputs setting of the Key Vault action to On. When the outputs are secured, it means the values (including the secret’s plain text) won’t be logged in the Logic App’s Run History.

Completing the Logic App
The Logic App is now ready to run. Depending on your specific needs, the Logic App might need to perform some additional actions, such as evaluating the HTTP status code of the PUT request to ensure that the action was successful, notifying someone via email or Teams message, etc.
Resources
Here are links to documentation and blog posts that aren’t already linked in other places in this article.
Controlling app access on a specific SharePoint site collections is now available in Microsoft Graph

I have performed exactly as you have mentioned but the Logic app trigger is throwing skipped status. Can you please assist
It’s a little tough to help without more information. If the Logic App trigger is skipped, try to see why from the Logic App logs. You can send the Logic App’s diagnostic logs to a Log Analytics Workspace. That might give you insights.