
I’ve recently been engaged on several customer projects where file uploads to an Azure Storage account have to be scanned for malicious content. Usually, this functionality is needed to ingest data safely into an Azure-hosted research environment. In this post, I am describing a solution I designed to scan the uploads for malware using the VirusTotal service. This design involves the use of a Logic App and the VirusTotal API (version 3) or the new VirusTotal Logic App connector.
Please note that for the proof of concept, I used a free VirusTotal account. Be sure to review VirusTotal’s terms and conditions for the use of their service. In my reading, any use of VirusTotal for this purpose would require VirusTotal Premium.
Note: This approach is not designed to replace but enhance Azure Defender for Storage. Azure Defender for Storage, when enabled, will perform multiple reviews on the storage account, including checking for malicious content. The documentation describes that Azure Defender for Storage might take several hours to analyze new content. Defender for Storage works by simply flipping the switch and includes file shares in the storage account, in addition to blob storage.
Architecture

- The Logic App is notified of a new blob uploaded to a specific container in the storage account.
Note: this could be a blob container or an Azure Data Lake Storage (ADLS) Gen2 container. - The Logic App requests a SAS token for the newly uploaded blob.
The SAS token is limited in time and provides read access only. - The Logic App calls the VirusTotal API to request analysis of the file, using the SAS URL.
VirusTotal will download the file from the storage account and submit it for analysis to the engines that make up VirusTotal.
VirusTotal returns an analysis ID for the analysis request. - After some time (a few minutes should be sufficient), the Logic App requests the results of the analysis using the analysis ID.
VirusTotal returns JSON containing both details and a summary of the analysis. - The Logic App evaluates the analysis performed by VirusTotal and can perform actions depending on the determination made by VirusTotal.
This is not further covered in this post. In case the file is clean, you would move it to the final storage account or container. In case the file is deemed malicious, you might move it to a quarantine folder and notify an administrator to manually evaluate it further.
Building the Logic App
In this section, I’ll describe how to build the Logic App step-by-step using the Azure Portal. At the bottom of the post, I have a link to a GitHub gist that contains the code for the Logic App, which you can simply copy and paste. You will need to provide configuration for the VirusTotal and Azure Blob Storage connectors.
I presume you have:
- created an Azure Storage account,
- an Azure subscription where the Microsoft.Logic resource provider has been registered,
- a VirusTotal API key.
Create the Logic App
- Open the Azure Portal.
- Optionally, create a new resource group to hold the Logic App and associated resources.
I am using a resource group named rg-blob2virustotal-demo-eastus-01. The naming convention is based on the Microsoft Cloud Adoption Framework‘s naming convention. - If you’d like to capture the execution of the Logic App in a Log Analytics workspace, create one (or plan to use an existing one, if appropriate).
I created a workspace named law-blob2virustotal-demo-eastus-01. - From the resource group’s Overview pane, click the Add button.
- In the Azure Marketplace, search for Logic App.
- Click Create.
- In the Create a logic app wizard, enter the following details (I’ve ommitted those that are left to defaults, unless I am adding an explanation):
- Logic app name: follow your organizational naming standard. I am using la-blob2virustotal-demo-eastus-01.
(Yes, I am aware of the potentially confusing law-* and la-* names. Adjust as you see fit for your purpose.) - Region: choose the region of your storage account.
- Enable log analytics.
- Log Analytics workspace: select your Log Analytics workspace.
- Tags: According to your organizational standard.
- Logic app name: follow your organizational naming standard. I am using la-blob2virustotal-demo-eastus-01.
- You should now have three or four resources in your resource group:
- The Logic App.
- The Log Analytics workspace.
- A Log Analytics solution (to monitor the Logic App).
- An Azure Storage account, if you created these resources in the same resource group.

Build the Logic App and Create the Trigger
- In the Azure Portal, click on the Logic App’s name.
- If this is a new Logic App, the designer will load automatically. If it doesn’t, go the designer.
- Click the tile to start with a Blank Logic App.
- In the Search connectors and triggers box, type azure blob.
- Click the Azure Blob Storage connector and then the When a blob is added or modified (properties only) trigger.
- Choose a name for the connection. I recommend, again, following your organization’s standard.
Unfortunately, this does not affect the name of the API Connection resource that is created. It will always be azureblob or azureblob-n where n is a sequential number if an Azure blob API Connection already exists in the resource group. - Select your Storage account.
- Click the Create button.
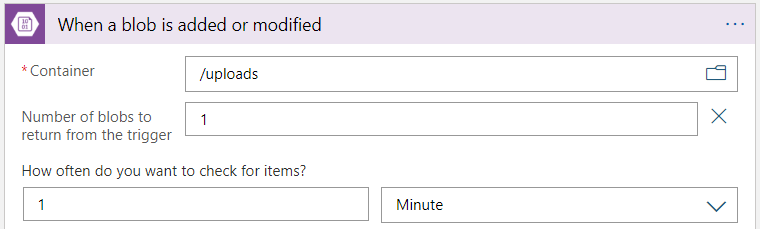
This creates an API Connection resource to the selected Storage account. - Select the container where new blobs will land.
My container is named uploads. - Set Number of blobs to return from the trigger to 1.
You could design a Logic App that could handle multiple blobs simultaneously, but that is beyond the scope of this post. - Set How often do you want to check for items? to a reasonable interval for your use case.
I am impatient, so I used 1 minute. - If desired, rename the trigger.
This trigger is not an Azure resource, so choose a descriptive text, including spaces, etc.
In the architecture diagram, this completes step 1.
Create the Initial Actions
- Click the New step button.
- Search for and select the Condition action.
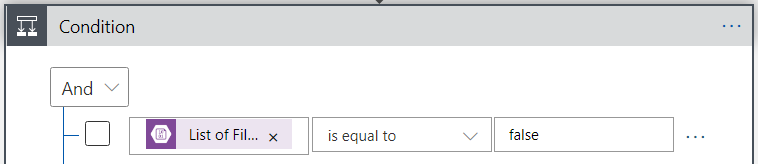
For brevity, this is not illustrated in the architecture diagram. - The first and only condition will be checking to make sure that the new item is not a folder:
- In the Choose a value box, select the List of Files IsFolder Dynamic content item.
- Set the comparison operator to is equal to.
- Type false in the operand textbox.
- We will not use the False path of this condition.
- In the True path, click the Add an action hyperlink.
- Search for the Create SAS URI by path action for the Azure Blob Storage connector.
This is step 2 in the architecture diagram. - Configure the action as follows:
- Blob path: Use the List of Files Path dynamic content from the trigger.
- Permissions: Read should be the only selected permission.
- Use the Add new parameter dropdown to add Expiry Time.
- Set the value of the Expiry Time parameter to the following expression:
addMinutes(utcNow(), 5)
This will expire the token five minutes after it’s created. In my (admittedly limited) testing, this has proven sufficient. - I recommend that your Storage account should only be accessible using HTTPS. If you have a valid reason for it not to be, you should consider adding a parameter for Shared Access Protocol and setting the value to HttpsOnly.

- Click the Add an action link again. Search for and select the Analyse an URL (preview) action.
- Create a connection to VirusTotal by choosing a Connection name, entering your API key in the x-api_key field, and clicking the Create button.
- Configure the Analyse an URL (Preview) action by setting the URL parameter to the Web Url dynamic content of the Create SAS URI by path action.
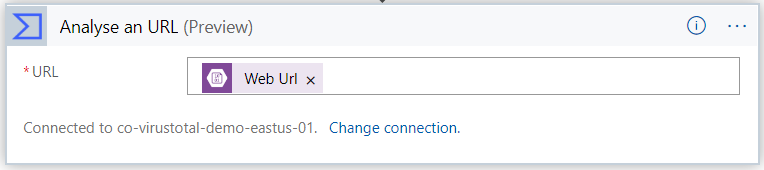
This wraps up step 3 in the diagram. Now is a good time to save your Logic App and test it out by uploading a new blob in your Storage account’s selected container. When the Logic App has run, review the execution from the run history (in the Logic App’s Overview pane). Observe that the output of the VirusTotal action is an id. That id is the ID of the analysis that we’ll use in step 4 of the diagram.
PS: For future tests, you do not have to upload new blobs each time; you can simply Resubmit the first execution.
Retrieve and Evaluate the Analysis
These final actions represent steps 4 and 5 in the architecture diagram.
- Return to the Logic App designer.
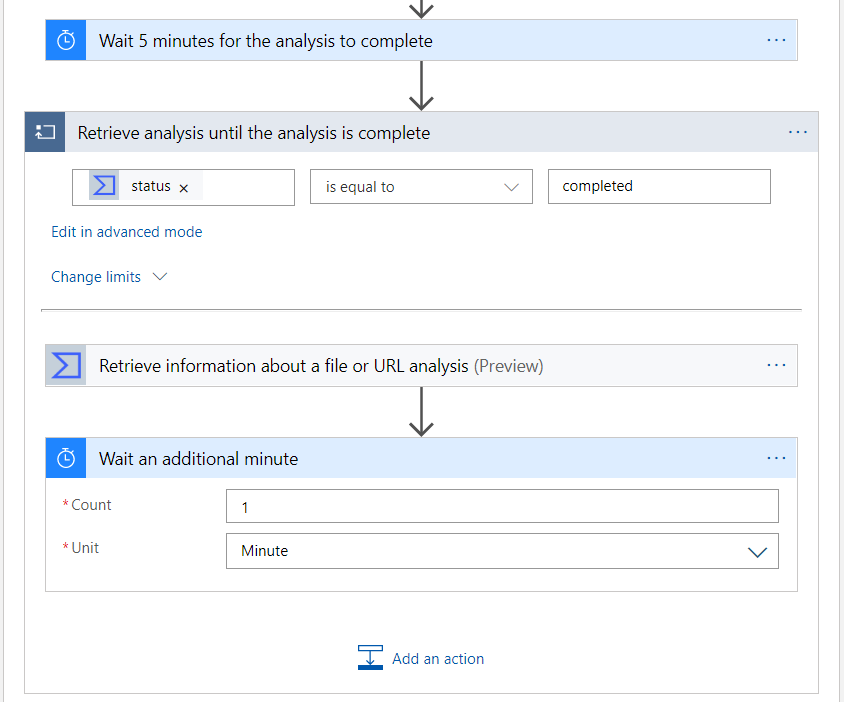
- Add another action in the True path of the condition. Choose the Delay action and configure the delay for 5 minutes.
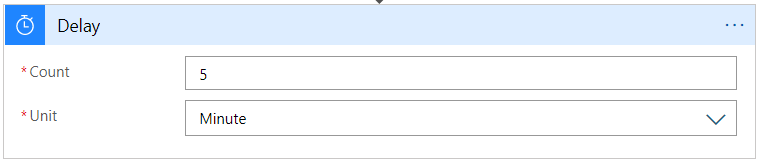
This delay is to give VirusTotal sufficient time to complete the analysis.
- Follow the delay with a Retrieve information about a file or URL analysis (preview) VirusTotal action.
- In the id parameter, use the id dynamic content value from the Analyse an URL action.
You should consider resubmitting your first Logic App execution, so you can examine the output of this last action. If your delay isn’t sufficient (perhaps because you have submitted a large file), you might find that the output’s status property is queued. To address this concern, we’ll modify the Logic App to include a loop that checks the analysis on a regular interval until the analysis is complete.
- Return to the Logic App designer and after the Delay action, insert a new step. Hover over the arrow connecting the Delay and VirusTotal actions and the Insert a new step button will appear.
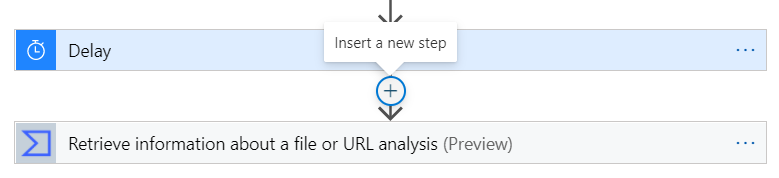
- Click the Insert a new step button and then the Add an action option.
- Select the Until control action.
- Drag and drop the VirusTotal action to retrieve the analysis inside the Until action.
- Configure the condition of the Until action to use the status dynamic content value from the retrieve VirusTotal action, set the comparison operator to is equal to, and enter completed as the comparison operand.
Be careful not to mistake the stats property for the status property. - Inside the Until action, add a new Delay action that waits for another minute, or a value that make sense for you.
- Rename the Delay and Until actions as appropriate.
Note: Yes, this means that even if the analysis was complete after the first call, the logic app will wait another minute. This can be avoided by adding another condition between the VirusTotal and Delay actions inside the Until action. For brevity, this was excluded from this walkthrough, however, it is included in the gist.
Now, we’ll wrap up the Logic App by adding a condition to evaluate the VirusTotal analysis.
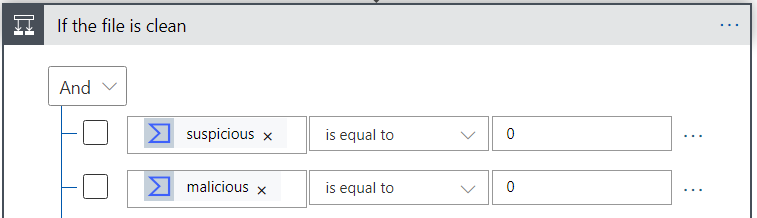
- Outside the Until action, but inside the True path of the first condition, add a new Condition action.
- Configure the condition with two criteria (rows) using the (default) And boolean operator. Use the conditions to check that the malicious and suspicious output properties of the VirusTotal analysis both equal 0 (zero).
Based on your needs, you would proceed by adding appropriate actions in the True and False paths of this condition.
More Thoughts
In this section, I am adding some additional considerations that might apply to your situation.
Gating Uploads
Not covered in this post is a method to “gate” the uploads. Rather than directly uploading to a storage account associated with the research environment, uploads should land in a staging storage account. The staging storage account contains at least two containers: one for uploads and one for approved files. Let’s assume the respective containers are named uploads and approved.
Once a file is deemed clean, either by this Logic App or manually by a human approver, the file is moved to the approved container. A separate process (e.g., an Azure Data Factory pipeline) is triggered by the addition of a blob in the approved container and moves the blob from the approved container to the actual research environment’s storage account.
Why not have the Logic App move the file directly to the final storage account?
Because a file that was detected as potentially malicious might be approved after a manual review. It’s trivial for a manual reviewer to move the blob to the approved folder from where it will be sent automatically to the final storage account. Compare that to asking the approver to determine the final storage account and then ensuring permissions are in place. This is a less error-prone design and especially critical when the final storage account is part of a secure research enclave that prevents direct access to the storage account.
Use a File Hash Instead of the File Contents
If your files contain sensitive data, you might not want to submit the file contents to VirusTotal. Instead, you could submit the hash of the file. Submitting a hash is a different API call than submitting a URL, but otherwise, the flow is the same.
Unfortunately, Logic Apps currently does not have a connector to calculate a hash of a file. You might consider developing a Function app that does that.
Consider a process that would determine the blob type (perhaps based on the MIME type) to evaluate whether a full analysis or a hash match is sufficient. If the blob is a data file, a hash match might be sufficient. However, if the file is executable, a full analysis might be warranted.
VirusTotal Outbound IP
If VirusTotal publishes the IP addresses used for its outbound connections to retrieve the URL (I have no idea if they do), you could further restrict the SAS token by including that (list of) IP address(es) as a parameter.
The VirusTotal Connector is in Preview
If you’d rather not use the preview connector for VirusTotal that’s built into Logic Apps, you can achieve the same outcome by replacing the VirusTotal actions by REST API calls. You’ll need to configure a little more. Crucially, to submit the URL for analysis, you must use an HTTP action and configure it to:
- Use the HTTP POST method.
- Set two HTTP headers:
- Content-Type: application/x-www-form-urlencoded
- x-apikey: your VirusTotal API key
- Define the body as
url=Web Url
where Web Url is the Dynamic content from the Create SAS URI by path action.
You will also have to parse the JSON response from VirusTotal to extract the analysis ID. Similarly, you will have to parse the response when retrieving the result of the analysis. With Logic Apps’ Parse JSON action, this isn’t too difficult, but it’s still an extra step.
Summary
If you followed along, you’ve designed and implemented a solution that scans newly added or modified blobs in an Azure Storage container using the VirusTotal API. Your next step would include adding actions to the Logic App to handle clean and malicious blobs.
On a side note, I expect that you have seen the benefits of having a corporate naming standard for Azure resources. Once established and adopted, naming resources is quite simple. I have seen firsthand how the adoption of a naming standard leads to quick consensus when new resources need to be created. Furthermore, if resources are created through automation, as in a DevOps scenario, a structured naming standard is vital. Finally, structured naming standards also makes retrieving Azure resources via scripting more predictable.
Resources
Here are background resources on the various services used. At the bottom, you’ll also find the GitHub gist containing the Logic App code.
- Logic Apps Tutorial: Quickstart – Create your first Logic Apps workflow – Azure portal – Azure Logic Apps | Microsoft Docs
- VirusTotal API: Check our API (virustotal.com)
Logic App Connectors
- VirusTotal: Virus Total – Connectors | Microsoft Docs
- Delay: Delay the next action in workflows – Azure Logic Apps | Microsoft Docs
- Until: Add loops to repeat actions – Azure Logic Apps | Microsoft Docs
- Azure Blob Storage: Azure Blob Storage – Connectors | Microsoft Docs
- Condition: Add conditional statements to workflows – Azure Logic Apps | Microsoft Docs
Gist
Link, in case the embed doesn’t show for you: https://gist.github.com/SvenAelterman/ce5add945fb4498f06cd25f057b96bd4
| { | |
| "definition": { | |
| "$schema": "https://schema.management.azure.com/providers/Microsoft.Logic/schemas/2016-06-01/workflowdefinition.json#", | |
| "actions": { | |
| "If_the_new_or_modified_item_is_a_file": { | |
| "actions": { | |
| "Analyse_an_URL": { | |
| "inputs": { | |
| "body": { | |
| "$content-type": "multipart/form-data", | |
| "$multipart": [ | |
| { | |
| "body": "@body('Create_SAS_URI_by_path')?['WebUrl']", | |
| "headers": { | |
| "Content-Disposition": "form-data; name=\"url\"" | |
| } | |
| } | |
| ] | |
| }, | |
| "host": { | |
| "connection": { | |
| "name": "@parameters('$connections')['virustotal']['connectionId']" | |
| } | |
| }, | |
| "method": "post", | |
| "path": "/api/v3/urls" | |
| }, | |
| "runAfter": { | |
| "Create_SAS_URI_by_path": [ | |
| "Succeeded" | |
| ] | |
| }, | |
| "type": "ApiConnection" | |
| }, | |
| "Create_SAS_URI_by_path": { | |
| "inputs": { | |
| "body": { | |
| "AccessProtocol": "HttpsOnly", | |
| "ExpiryTime": "@{addMinutes(utcNow(),5)}", | |
| "Permissions": "Read" | |
| }, | |
| "host": { | |
| "connection": { | |
| "name": "@parameters('$connections')['azureblob']['connectionId']" | |
| } | |
| }, | |
| "method": "post", | |
| "path": "/datasets/default/CreateSharedLinkByPath", | |
| "queries": { | |
| "path": "@triggerBody()?['Path']" | |
| } | |
| }, | |
| "runAfter": {}, | |
| "type": "ApiConnection" | |
| }, | |
| "If_the_file_is_clean": { | |
| "actions": {}, | |
| "expression": { | |
| "and": [ | |
| { | |
| "equals": [ | |
| "@body('Retrieve_information_about_a_file_or_URL_analysis')['data']['attributes']['stats']['suspicious']", | |
| 0 | |
| ] | |
| }, | |
| { | |
| "equals": [ | |
| "@body('Retrieve_information_about_a_file_or_URL_analysis')['data']['attributes']['stats']['malicious']", | |
| 0 | |
| ] | |
| } | |
| ] | |
| }, | |
| "runAfter": { | |
| "Retrieve_analysis_until_the_analysis_is_complete": [ | |
| "Succeeded" | |
| ] | |
| }, | |
| "type": "If" | |
| }, | |
| "Retrieve_analysis_until_the_analysis_is_complete": { | |
| "actions": { | |
| "If_analysis_is_not_complete_yet": { | |
| "actions": { | |
| "Wait_an_additional_minute": { | |
| "inputs": { | |
| "interval": { | |
| "count": 1, | |
| "unit": "Minute" | |
| } | |
| }, | |
| "runAfter": {}, | |
| "type": "Wait" | |
| } | |
| }, | |
| "expression": { | |
| "and": [ | |
| { | |
| "not": { | |
| "equals": [ | |
| "@body('Retrieve_information_about_a_file_or_URL_analysis')['data']['attributes']['status']", | |
| "completed" | |
| ] | |
| } | |
| } | |
| ] | |
| }, | |
| "runAfter": { | |
| "Retrieve_information_about_a_file_or_URL_analysis": [ | |
| "Succeeded" | |
| ] | |
| }, | |
| "type": "If" | |
| }, | |
| "Retrieve_information_about_a_file_or_URL_analysis": { | |
| "inputs": { | |
| "host": { | |
| "connection": { | |
| "name": "@parameters('$connections')['virustotal']['connectionId']" | |
| } | |
| }, | |
| "method": "get", | |
| "path": "/api/v3/analyses/@{encodeURIComponent(body('Analyse_an_URL')?['data']?['id'])}" | |
| }, | |
| "runAfter": {}, | |
| "type": "ApiConnection" | |
| } | |
| }, | |
| "expression": "@equals(body('Retrieve_information_about_a_file_or_URL_analysis')['data']['attributes']['status'], 'completed')", | |
| "limit": { | |
| "count": 60, | |
| "timeout": "PT1H" | |
| }, | |
| "runAfter": { | |
| "Wait_5_minutes_for_the_analysis_to_complete": [ | |
| "Succeeded" | |
| ] | |
| }, | |
| "type": "Until" | |
| }, | |
| "Wait_5_minutes_for_the_analysis_to_complete": { | |
| "inputs": { | |
| "interval": { | |
| "count": 5, | |
| "unit": "Minute" | |
| } | |
| }, | |
| "runAfter": { | |
| "Analyse_an_URL": [ | |
| "Succeeded" | |
| ] | |
| }, | |
| "type": "Wait" | |
| } | |
| }, | |
| "expression": { | |
| "and": [ | |
| { | |
| "equals": [ | |
| "@triggerBody()?['IsFolder']", | |
| false | |
| ] | |
| } | |
| ] | |
| }, | |
| "runAfter": {}, | |
| "type": "If" | |
| } | |
| }, | |
| "contentVersion": "1.0.0.0", | |
| "outputs": {}, | |
| "parameters": { | |
| "$connections": { | |
| "defaultValue": {}, | |
| "type": "Object" | |
| } | |
| }, | |
| "triggers": { | |
| "When_a_blob_is_added_or_modified": { | |
| "inputs": { | |
| "host": { | |
| "connection": { | |
| "name": "@parameters('$connections')['azureblob']['connectionId']" | |
| } | |
| }, | |
| "method": "get", | |
| "path": "/datasets/default/triggers/batch/onupdatedfile", | |
| "queries": { | |
| "checkBothCreatedAndModifiedDateTime": false, | |
| "folderId": "JTJmdXBsb2Fkcw==", | |
| "maxFileCount": 1 | |
| } | |
| }, | |
| "metadata": { | |
| "JTJmdXBsb2Fkcw==": "" | |
| }, | |
| "recurrence": { | |
| "frequency": "Minute", | |
| "interval": 1 | |
| }, | |
| "splitOn": "@triggerBody()", | |
| "type": "ApiConnection" | |
| } | |
| } | |
| }, | |
| "parameters": { | |
| "$connections": { | |
| "value": { | |
| "azureblob": { | |
| "connectionId": "", | |
| "connectionName": "azureblob", | |
| "id": "" | |
| }, | |
| "virustotal": { | |
| "connectionId": "", | |
| "connectionName": "virustotal", | |
| "id": "" | |
| } | |
| } | |
| } | |
| } | |
| } |
