
Most Azure customers use App Service to host web sites and applications that are available on the public Internet. However, there are use cases for using the PaaS features of App Service only from your private network. Traditionally in Azure, you would have used an App Service Environment (ASE) for that purpose. With ASE v3 becoming generally available in November 2021, it’s a stronger offering than ever. However, there’s still some overhead that might be avoided by using the public PaaS service. In this article, I am going to show how you can have a private App Service instance that uses a custom domain name that only exists in your private DNS namespace.
To make the most of this post, familiarity with Private Endpoints and VNet integration will be helpful. I also recommend that you review the limitations of App Services and VNet integration.
App Service with Private Endpoint and Public Custom Domain
App Service can be integrated with the Private Link service. This means that the path from the client to the application will be via one or more of your Azure Virtual Networks. However, merely using a private endpoint doesn’t affect how the app communicates outbound with dependencies (for example, first- or third-party APIs).
Let me recap the process of validating a custom domain name that exists in a public DNS namespace, for example test-app.aelterman.info:
- Create your App Service.
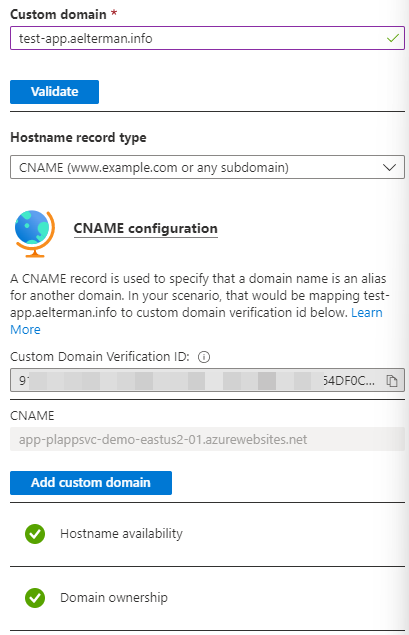
Any App Service Plan but the free tier supports custom domains. (Compare App Service Plan SKUs.) - Add the custom domain.
The screenshot below shows how to do this in the Azure Portal.

- After clicking Validate, you will see instructions on how to validate the custom domain using an A record or a CNAME record. You’ll also need to create a TXT record.
- Create the required records in your public DNS namespace.
- Click Validate again. If the app service can successfully query for the existence of the two DNS entries, you can click the Add custom domain button. Your domain will then immediately be available.
Notes
For guidance on how to perform this for an active domain (i.e., a domain that’s already serving traffic and for which you don’t want to incur downtime), see https://docs.microsoft.com/azure/app-service/manage-custom-dns-migrate-domain.
In this article, I am also not covering the DNS configuration required to resolve private endpoint addresses. However, links are provided in the Resources below.
You will need to take additional steps to provision a TLS certificate to bind to your custom domain name. Fortunately, the App Service Managed Certificate option can help you do this quickly and at no charge.
The custom domain verification ID and the app’s CNAME shouldn’t change. This means you can create those entries in DNS prior to attempting to add the custom domain. I just find it practical to have both the verification ID and the CNAME entry on the same pane.
App Service with a Private Domain
When you want the app to use a custom domain that is only available on your internal DNS (e.g., test-app.corp.aelterman.info where corp.aelterman.info does not exist in the public DNS namespace for aelterman.info), you’ll need to at least temporarily create a TXT DNS record in the public namespace for validation. Why? When validating the custom domain using DNS, the Azure infrastructure does not use your custom DNS servers. This is true even if VNet integration is enabled.
For your app to run, you might still need to configure VNet integration and custom DNS servers if your App Service needs to reach other internal resources. This might be necessary if one private API needs to leverage another. Therefore, I am including directions on configuring VNet integration and DNS resolution below. Just understand that this will not help you validate your custom domain using your private DNS namespace.
I am going to cover these changes at a fairly high level, but links to additional resources are available at the end of the article. You’ll note that I am covering DNS resolution via the VNet first because this might alleviate the need to restart the App Service after performing VNet integration to get DNS resolution to work correctly.
Most likely, you’ll use a private custom domain name in combination with private endpoints for the app, though technically, they could exist independently of each other.
I am going to assume that you have the following prerequisites taken care of:
- A virtual network exists in the same region as your App Service.
- In that VNet, you have an empty subnet with a size of at least /28 available.
You might have already delegated the subnet to the Microsoft.Web/serverFarms service, but if not, it will be done for you.
DNS Resolution via Virtual Network
Once your App Service will be VNet integrated in the next step, it will use the DNS servers of your virtual network to perform name resolution. If you had previously configured the virtual network to use your custom DNS servers to enable resolution of your private namespace (in my example, corp.aelterman.info), you should be all set.
To verify or configure custom DNS servers for your virtual network:
- In the Azure Portal, navigate to the Virtual Network you will use to integrate your app.
- Open the DNS servers pane.
- Verify that you have a Custom list of suitable DNS servers.
- If you need to change or update the list, add one DNS server IP address per line and click Save when you’re done.
Virtual Network Integration
Complete these steps to configure VNet integration for your App Service:
- Go the Networking pane of the App Service.
- Click the VNet integration link.
- Click the Add VNet button.
- Select the VNet and subnet (those from the prerequisites above).
- Click OK.
- After the VNet integration is complete, verify that the Route All toggle switch is Enabled. This switch causes all outbound connections from the App Service to be routed via your virtual network.
Without it, only connections to IP addresses in the RFC 1918 private ranges would be established via VNet integration.
It’s important to keep in mind that multiple App Services can share a single subnet for VNet integration only if they are all hosted in the same App Service Plan. That’s because the App Service Plan is the unit of compute and different App Service Plans might exist in different scale units, even in the same region.
“Private” Custom Domain Name
Once these configuration changes have been made, you can proceed to add and validate the custom domain name that only resolves in your private DNS namespace. Use the same steps you followed above to add the custom domain but add the CNAME (or A) record in your private DNS namespace. Create the TXT record with the verification ID in the public namespace.
After domain validation is complete, you can remove the TXT record from the public namespace.
Diagram
The diagram below illustrates how an App Service with a private link endpoint and a private custom domain name is deployed in Azure.

The diagram assumes that the private endpoint’s DNS entry is duplicated from the Private Azure DNS Zone privatelink.azurewebsites.net. However, at scale, forwarding on-premises DNS requests for Private Link zones to Azure DNS might be preferred.
Summary
This article has demonstrated the steps needed to use the public Azure Platform-as-a-Service App Service offering for a private web application deployment.
Perhaps it’s worth restating that App Service Environment is an alternative to the combination of private link and VNet integration. Through ASE v2, the costs were significantly higher. However, with the improvements introduced in ASE v3, some of this concern has been alleviated.
Resources
In addition to the articles linked throughout the post, these additional resource links are also relevant.
Tutorial: App Service Custom Domain Name
Tutorial: App Service VNet integration
Tools for troubleshooting VNet integration (including DNS resolution) in App Service
